How to Make Chamomile Soap (all-natural cold process recipe)
It is now early summer, and one of the most beautiful medicinal herbs is blooming: chamomile. This is German chamomile; it grows up quite a bit taller than Roman chamomile. Sometimes, or oftentimes, it needs a little bit of support but is otherwise pretty easy to grow. Once you harvest the flowers, you can dry them out or use them fresh in herbal teas—really calming and delicious teas. They are also a great skincare herb in that they are really calming and soothing to the skin, really great for eczema and inflamed skin conditions. Today, I am going to show you how to use them to make handmade soap. This is cold-processed soap from scratch; it is all-natural and vegan as well. We are going to be using chamomile to make an infusion to mix throughout the bars, we are also going to be using chamomile essential oil, and we are going to be drying out the flowers as well so that we can use them as a decoration.
Natural Soap Making for Beginners
I have a brand new online soap making course available for you to enroll in. It is called Natural Soap Making for Beginners, and in it, I introduce you to the ingredients, the equipment, safety, setting up your soap making station, and step-by-step soap making. There are also plenty of printables in there, and the course guides you through using various different ingredients so that by the end, you will have successfully made quite a few batches of soap but also have the confidence to go on and make many more different types of recipes using flowers, herbs, and other natural ingredients that you might come across.
A Gentle and Soothing Recipe
This is a small one-pound or 454-gram batch of cold-processed chamomile soap. It is all-natural, palm oil-free, and vegan. The batch creates five to six bars of gentle and sweetly scented soap. Chamomile smells a little bit like apples, and it is also a soothing skin herb, so it is great in natural skincare recipes and handmade soap.
Harvesting and Drying Chamomile
The first step in making chamomile soap is getting all of your ingredients together, organizing them, and measuring them out. That includes the chamomile. You will need some dried chamomile for this recipe to decorate, and you can use fresh or dried chamomile to make the infusion for the lye solution. You can purchase dried chamomile, and that is perfectly fine to use in this recipe, but if you grow your own, the quality will be much better. The scent will be much more intense, and when you dry it, it will actually look like dried chamomile. More often than not, when you purchase dried chamomile, it turns up brown and a little bit discolored and does not look like this. You can still use it, though; it is perfectly fine.
To harvest chamomile, you will want to harvest the flowers when they are fully open, so late morning or early afternoon is best. Pluck them and then get them drying as soon as you can. If you would like to use a food dehydrator, then you will want to set it on a pretty low setting, 30 to 40 Celsius, and dry it for a couple of hours or until the chamomile flowers are bone dry.
Ingredients for Homemade Chamomile Soap
These are the ingredients that you will need to make homemade chamomile soap. Chamomile flowers are the first ingredient that we need to talk about. This is chamomile that I grew, harvested, and dried last year. A lot of purchased chamomile will look similar to this or even a little bit darker and a little bit less flower-like; some of it just looks like chaff. In contrast to that, this is chamomile that I picked earlier and dried in the food dehydrator. It is now room temperature, and this is going to be great for decorating the tops of the soap. If you are working with dried chamomile that looks dark, then maybe think twice about using it to decorate the tops of the soap and maybe just leave that with an embellishment of texture rather than adding a bit of dried flower material on top.
I am using this to make the chamomile infusion for the lye solution, and there are two tablespoons of dried chamomile in here. If you wanted to use fresh, you would double the amount to four tablespoons. This is distilled water that we are using to make that infusion. Over here is sodium hydroxide; this is the lye that we are using to make soap. This is not an optional ingredient; this is the magic ingredient that helps you to make cold-processed soap. In the little bottle here is Roman chamomile essential oil. This is quite an expensive ingredient, but it gives that really beautiful, Appley chamomile scent to your bars. In the pan, we have three different solid oils: coconut oil, shea butter, and cocoa butter. Then, in this jug, there is olive oil and castor oil.
Making the Chamomile Infusion
The first step is making the chamomile infusion. I have the dried chamomile here, and I also have some distilled water. We use distilled water in soap making and in making skincare because it does not have any contaminants, dust, or bacteria in it that could affect the shelf life of the end products. To make the infusion, we are going to have to heat the water. You can do this in the microwave, an electric kettle, or on a hob. I am just going to pour it into a pan and heat it until it is just starting to steam. We do not want it to boil; we just want it hot enough to be able to infuse into the flowers. Put the chamomile flowers in and pour that hot distilled water over the top. All we need to do now is allow this to cool to room temperature.
Once the chamomile infusion has cooled down, it is time to strain it. You can use a little sieve or a larger one. This is really just to remove all of the little bits of chamomile from that liquid. This is optional, but if you do put the chamomile bits into your soap, they can be a little bit scratchy and they will certainly turn brown over time. Strain them out so that we have a nice, lovely, even yellow color to our soap. I am gently squeezing the chamomile because it does absorb quite a bit of water. What we have left is a chamomile infusion with very few little flecks of chamomile. If you want to be meticulous with removing all of them, you will want to use a cheesecloth rather than a sieve. We need to measure out 124 grams of this infusion.
Preparing the Lye Solution
I have the lye, the sodium hydroxide, and the chamomile infusion that we have just made measured out. I have also got a silicone spatula and a basin that I have shallowly filled with water. All I am going to do is pour the lye into the chamomile infusion. It is changing color already. Make sure that you get your spatula in there and give it a good stir right off the bat. It is turning into that lovely yellow color, and that color will transform our soap from an off-white color to a lovely pale yellow color. This lye solution is really hot right now, which is why we are going to carefully put it into a basin just so that cold water can help to cool it down.
Melting the Solid Oils
While the lye solution is cooling down, we need to melt the solid oils. We need to melt the coconut oil, shea butter, and cocoa butter together and get them down to just melted—no more. We do not want it to be sizzling hot; we just want these to be melted and for the oils to be transparent. Set the heat on very low. Moving the oils around with a spatula and trying to break them up helps to speed up how quickly these melt down. Once the oils are fully melted, add the liquid oils to the pan. This is olive oil and castor oil together. I am giving it a good stir because the castor oil is very thick. Pour this in against a spatula to help reduce air bubbles from forming in your soap. We are trying to get the temperature down to 100 degrees Fahrenheit, which is 38 degrees Celsius.
Mixing the Soap Batter
The next step is getting the lye solution into the pan of oils. I have my mold ready, sitting on some cardboard, and I also have my immersion blender ready to go. Lastly, the chamomile essential oil is waiting. I am going to pour the lye solution through the sieve and against the spatula. Now we are going to need to bring this to an emulsion and trace, which is a thickening of the ingredients. Using an immersion blender speeds up the process of getting soap to trace by quite a bit, but you do need to use it in a very precise way. Put it into the shallow pan of oils at an angle to reduce the amount of air inside the head of the immersion blender. Once it is inside, give it a little bit of a tap on the bottom. Stir with it while the immersion blender is off, and then you can pulse with it as long as it is stationary and pressed to the bottom of the pan.
Repeat this until the soap thickens up just slightly. Trace is usually when you can see a little drizzle just on the surface of the soap batter—just enough to leave a little bit of a texture before going back down. This is the perfect point to stop mixing. Now, I am going to add one teaspoon of chamomile essential oil. With this particular essential oil, you do not need much. Make sure that you stir in all of that essential oil and that you do not see any streaks in the soap batter.
Molding and Decorating
Now we are just going to get this soap batter in the mold. Get every last drop out of here and work as quickly as you can because the soap will continue to thicken up. Once the soap is in the mold, settle it by lifting it up and dropping it just a couple of times. That helps to get the soap to go into the corners and get the surface a little bit smoother. You could also add a little bit more texture if you would like. I am going to create just a little bit of extra texture on one side only. Next, we are going to decorate just on one side with chamomile flowers. I am just going to drop the chamomile flowers on top. I left little spaces in between each little group of chamomile flowers because it will be much easier to cut this into bars if I leave a little bit of a gap.
The Gelling Process
Next, I am walking the soap very carefully over to the oven, which I have preheated to 170 degrees Fahrenheit (about 77 degrees Celsius). I am just going to put the soap in the oven, turn it off, close it up, and leave it here overnight. The next morning, the soap is completely cool and it has completely gelled. It is a little bit darker in color than what it would be if you left it just out on the counter. I am going to leave the soap here for another day before I cut it up.
Cutting and Curing the Soap
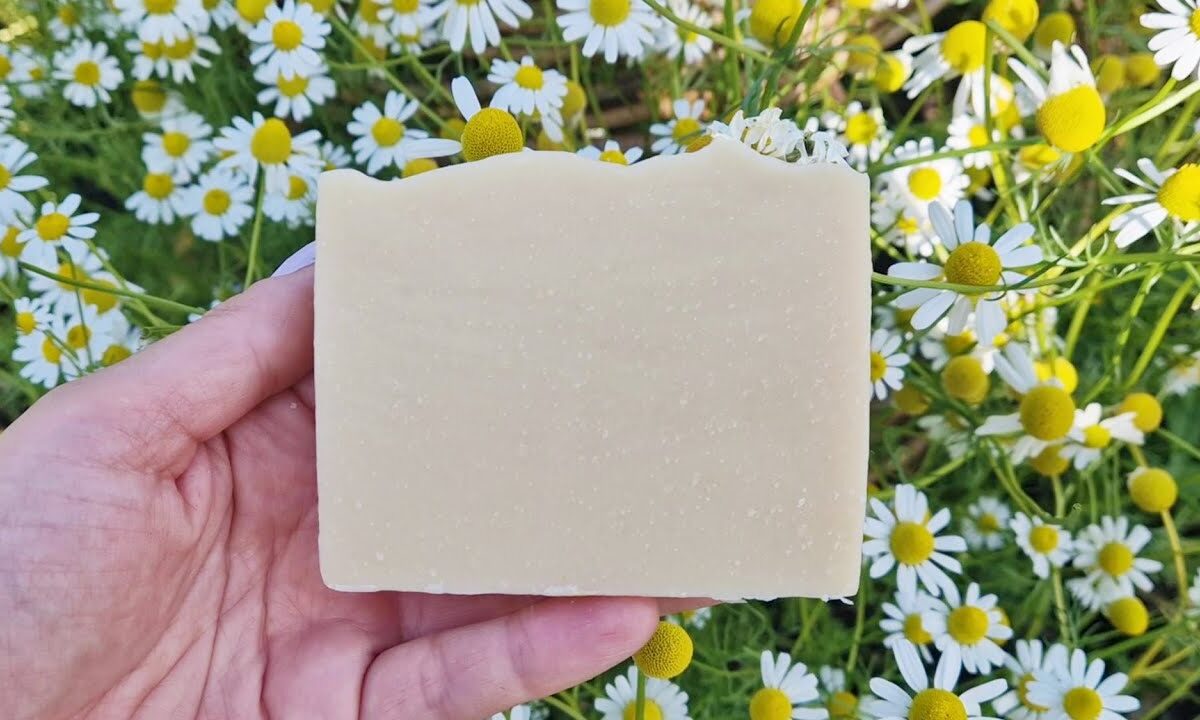
Two days after making cold-processed soap, most of the saponification is complete and it is relatively safe to handle the soap, but I am still wearing gloves because I do not want fingerprints on it and I just want to keep my skin safe. Once that suction is released from the bottom, it is relatively easy to get it out. When you get it out of the mold, you will have a perfectly square block of chamomile soap. This can be five bars, six, or even more depending on how wide you want your bars. When it comes to cutting this block of soap into bars, you can use just an ordinary kitchen knife and cutting board and cut them freestyle, or you can measure it out with a ruler and then cut precisely, or you can use a professional soap cutter.
I have cut that block of soap into five beautiful bars that each have the chamomile decoration on the top. You can see that rustic swirling as well. I am going to put these onto my curing rack. I am going to leave the soaps there for a month to dry out, to finish saponification, and allow the final crystalline structure to form before actually using them. You can do this in your own home on a bookshelf or someplace that is out of the way. Just make sure that it is dim, there is plenty of airflow, and that the soaps will not be disturbed. Leave them there; they will scent the room while they are curing, and then at the end of the month, you can start using them.
Conclusion
Chamomile is so fun to work with. It is easy to grow, it is fun to harvest, and it has so many benefits. It is also pretty safe to use as well. We could have it in medicinal teas, soothing infusions that you can make at home, and it is also great in soothing skincare. As we have just seen, it is not that difficult to use it to make homemade chamomile soap. If you would like a more broad introduction to making handmade soap, I do encourage you to check out the natural soap making for beginners course. It takes you on the journey of making different soap recipes step-by-step. Chamomile is also great for making a really beautiful and soothing skin cream.